

How To Make Alternating Colors In Indesign Table
Similar this commodity? We recommend
Formatting Tables
Earlier, nosotros mentioned that table cells are similar to InDesign text frames—and we now want to bespeak out that that similarity extends to the realm of formatting, as well. Table cells can exist filled using any fill y'all could use to a frame, and can use all of the strokes in InDesign'due south Stroke console (including custom stroke styles).
To format tabular array cells, however, you don't (usually) apply the same controls you use to format page items. Instead, you utilize a ready of tabular array formatting controls, most of which you lot'll find in the Table Options dialog box (press Control-Option-Shift-B/Ctrl-Alt-Shift-B) and Cell Options dialog box (press Command-Option-B/Ctrl-Alt-B).
Table Cell Strokes and Fills
Before we start talking almost table formatting, it's of import that you understand that applying a stroke to a column is exactly the same as applying a stroke to the left and right edges of all of the cells in that column. There are not separate stroke properties for rows and columns. If you lot change the stroke property of a column, the strokes on the respective cell borders in the cavalcade also modify. The same is true for table border strokes—these backdrop apply to the outside edges of the cells at the elevation, right, bottom, and left edges of the table.
Applying Strokes to Cells.
InDesign offers a number of dissimilar ways to fix the make full or stroke of a cell. Yous can set the stroke weight using the Stroke panel, or the Strokes and Fills panel of the Prison cell Options dialog box, or from the tabular array controls in the Command panel. You lot can prepare the fill of a cell using the Swatches panel, the Color console, or the Strokes and Fills panel of the Cell Options dialog box. This is not a complete listing of the different methods you tin utilise to format cells, but we call up you get the idea.
When yous want to employ a stroke to all of the borders of a cell or cells, follow these steps (see Figure six-29).
- Select a range of cells.
- Display the Stroke console or brandish the Strokes and Fills panel of the Cell Options dialog box (choose Strokes and Fills from the Cell Options submenu of the Context card), or display the Command panel.
- Enter a stroke weight in the Weight field and press Return/Enter (or otherwise apply the new value).
- Employ a stroke colour. If you lot're applying the stroke using the Stroke console or the Control panel, you can utilise the Swatches panel, the Color console, the Gradient panel, or whatever of the other color controls. If you're using the Strokes and Fills panel of the Prison cell Options dialog box, y'all tin use the Color popular-upward carte.
Each border of a cell in an InDesign table can take a different stroke. Note, however, that cells share borders with side by side cells. Applying a stroke to the right border of a jail cell affects the left border of the next prison cell in the row.
The Cell Proxy (in the Strokes panel of the Cell Options dialog box, or in the Control panel or Stroke panel) is the way that you tell InDesign which edge you desire to work with (see Figure 6-30). Just as the Proxy in the Transform panel "stands in" for the current selection, the Prison cell Proxy represents the selected prison cell or cell range.
When the borders in the Cell Proxy are highlighted (in light blue), changes yous make to the stroke color or stroke weight volition affect the respective cell borders. To prevent formatting from affecting a cell border, click the corresponding active border in the Cell Proxy. To make an inactive border active again, click it once more.
If you lot want to utilise a stroke to some, but not all, of the borders of a cell, follow these steps (see Effigy six-31).
- Select the cell or range of cells y'all want to format.
- Display the Stroke panel or display the Strokes and Fills console of the Cell Options dialog box (choose Strokes and Fills from the Cell Options submenu of the Context menu).
- Employ the Cell Proxy to select the jail cell borders you desire to format.
- Apply stroke formatting using the Strokes and Fills panel of the Cell Options dialog box, or the Stroke or Swatches panels.
Applying Fills to Cells.
To apply a fill to a cell, follow these steps (see Figure 6-32).
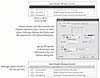
Figure 6.32 Applying a Make full to a Cell (Dialog Box Method)
- Select a cell or a range of cells.
- Display the Strokes and Fills panel of the Cell Options dialog box (to brandish this panel, choose Strokes and Fills from the Cell Options submenu of the Context or Tabular array menu).
- Choose a color swatch from the Color popular-up carte du jour, and enter a tint value in the Tint field, if necessary. Annotation that you lot can besides set the fill to overprint using the Overprint option.
- Click the OK button to close the dialog box and use the fill up.
Alternatively, you lot tin apply a fill up to a prison cell using the Swatches console or Color panel (encounter Effigy 6-33).
- Select a cell or range of cells.
- Click the Fill up selector at the superlative of the Swatches console or Color panel to go far active (if information technology's not already active).
- Click the swatch (if yous're using the Swatches panel) or color (if you're using the Color panel) to apply it to the prison cell.
Applying Gradients to Table Cells.
You tin apply a gradient to the fill and stroke of a cell, but the results might not exist what you lot'd look (come across Figure 6-34).
- Select the cells.
- Display the Gradient console, if information technology'south not already visible.
- Click in the Gradient Ramp to employ a gradient to the selected cells. Accommodate the slope settings to define the type, color, and bending of the gradient (as discussed in Affiliate 5, "Cartoon").
Notation that the gradient is based on the width and top of the table, rather than on the selected cell or cells. This may or may not give you the upshot yous're looking for. To gain more control over the start/end points of the slope, create and fill up a rectangle, then paste the rectangle into the cell.
Applying Diagonal Lines.
To apply diagonal lines to a jail cell, employ the options in the Diagonal Lines panel of the Prison cell Options dialog box (come across Effigy 6-35).
- Select a cell, row, cavalcade, or table (table border strokes apply to the entire table, so y'all need only select function of the table).
- Display the Diagonal Lines panel of the Cell Options dialog box (choose Diagonal Lines from the Cell Options submenu of the Context card).
- Turn on i of the diagonal lines options. Choose a stroke weight, stroke type, color, and tint. If you lot want the diagonal lines to overprint, turn on the Overprint pick. If you want the diagonal lines to appear in front of the table, turn on the Depict in Front end option.
- Click the OK push to apply the diagonal lines.
Formatting Table Borders.
To apply a stroke to the edges of a table, utilize the options in the Tabular array Border section of the Tabular array Setup panel of the Table Options dialog box (meet Figure 6-36). Note that applying a edge to a tabular array is the same equally applying borders to the outside edges of each of cells on each side of the tabular array—simply information technology's a lot faster.
- Select a cell, row, cavalcade, or table (table edge strokes utilise to the entire tabular array, then y'all need only select part of the table).
- Display the Table Setup panel of the Table Options dialog box (printing Command-Option-Shift-B/Ctrl-Alt-Shift-B).
- Choose a stroke weight, stroke type, color, and tint. If y'all want the stroke to overprint, plow on the Overprint selection.
- If you want to preclude the tabular array border formatting from overriding formatting you've applied to the cells in the table (i.e., any formatting other than the default table formatting), turn on the Preserve Local Formatting option.
Applying Alternating Fills and Strokes.
The options in the Row Strokes, Column Strokes, and Fills panels of the Tabular array Options dialog box provide a way for you to vary the formatting of rows and columns in a table according to a predefined pattern. Shading table rows or columns is oft a more visually pleasing way to format a tabular array than using strokes (this depends on the blueprint of the piece in which the tabular array appears).
All of these panels work the same manner—you select a blueprint from the Alternate Pattern pop-up card, then you specify the formatting practical by that blueprint. If the blueprint you lot chosee is None, InDesign doesn't alternate the corresponding fill or stroke properties in the table. Otherwise, InDesign applies one of 2 formats to the rows and columns in the table. Formatting yous apply using alternating fills or strokes overrides any jail cell formatting you've already applied to the cells in the tabular array (information technology has no effect on text formatting).
To apply an alternating fill or stroke design to a table, follow these steps (see Figure six-37).
- Select a jail cell, row, column, or table (this formatting applies to the unabridged table, so practice whatever is easiest for you lot).
- Display the panel of the Table Options dialog box that corresponds to the attribute you want to work with (i.e., Row Strokes, Column Strokes, or Fills). Turn on the Preview option—it can assistance you understand the effect of the formatting options.
- Choose an option from the Alternating Pattern pop-up menu.
- Choose a color for the alternating blueprint (until you do this, you probably won't encounter whatsoever changes to the table, fifty-fifty if you accept turned on the Preview option).
- If yous want the alternating blueprint to ignore rows at the kickoff or terminate of the table (for alternating row strokes) or at the left or right edges of the column (if you're working with alternate column strokes), enter the number of cells in the Skip First and Skip Last fields.
It should exist clear you can create quite circuitous alternating formatting using these options. The only existent way to larn how the different alternate formatting features piece of work is to experiment with the settings. Create an instance table, open the Tabular array Options dialog box, turn on the Preview option, and play!

Source: https://www.peachpit.com/articles/article.aspx?p=1381883&seqNum=5
Posted by: moralesoughts.blogspot.com
0 Response to "How To Make Alternating Colors In Indesign Table"
Post a Comment